Tuesday, October 23, 2012

Coffee Meringues

I am not good at baking. From the previous unsuccessful experiments I think I am better in cooking dishes. But when I see Giada making this in one of her shows, I am very tempted to try baking one. After looking at many people talking about their failed tries at making meringues,  I am well prepared for another failed attempt at making this coffee meringues. There's always a first time.

I love to eat meringues cos they are so fluffy and light. And they are made of egg whites only, seems to be pretty healthy. But what we buy outside tends to  be pretty sweet. However, when I research about making good meringues, they were saying sugar is important factor in making good ones. Therefore, for my 1st try I shall stick to the original measurement for the sugar.

I does not have cream of tartar at home. That's why I think my meringue did not maintain it's light airy and fluffy shape. Pardon the ugly look of the meringue. I did not use pipping bag or plastic bag to pipe out. And I am BAD in shaping the meringue. I saw some chefs using only 2 spoons and they can get a pretty nice shape, but I failed haha.

Inside of the meringue. Pretty compact. Not light and fluffy. But still crunchy ;p

Add a scoop of blue bell vanilla ice cream to go with the coffee meringue so yummy! 
But I am pretty satisfied with what I get today. At least it taste okie and not burnt. Thought it is not fluffy, but it is crunchy and I can still eat it as a biscuit ;p For my next attempt I will reduce the sugar and add cream of tartar. AND get a pipping bag! 


Recipe follows: Adapted from FoodNetwork Giada's recipe of coffee and chocolate meringue
Ingredients
  • 3 egg whites, at room temperature
  • Pinch fine sea salt
  • 3/4 cup superfine baker's sugar*(I used confectioner's sugar)
  • 1/8 teaspoon cream of tartar 
  • 1/4 teaspoon vanilla extract
  • 2 teaspoons instant espresso powder
  • 2/3 cup mini semisweet chocolate chips (I did not add this)
Directions
*Can be found at specialty cooking stores. Or you can use the food processor to grind the sugar into finer sugar.

Place an oven rack in the center of the oven. Preheat the oven to 300 degrees F (Saw some reviews which says that 300 is too high and recommended it to be 225 - 250. So i use 250 and it turn out well) Line a baking sheet with parchment paper. Set aside.

In a stand mixer fitted with the whisk attachment, beat the egg whites and salt until frothy, about 1 minute. With the machine on medium-high speed, gradually add the sugar, about 1 tablespoon at a time. Add the cream of tartar, vanilla extract, and espresso powder. Increase the speed to high and beat until the mixture is thick and holds stiff peaks, about 3 to 5 minutes. Using a spatula, fold in the chocolate chips. Drop 1/4 to 1/2 cup of the mixture onto the prepared baking sheet about 2 inches apart. Bake for 30 minutes. Rotate the pan and bake for another 30 minutes. Turn off the oven and allow the meringues to cool completely while still in the oven, about 2 hours.

Store airtight in a plastic container for up to 4 days.

Cook's Note: The meringue mixture can also be placed in a pasty bag fitted with a large, plain tip (recommended: Ateco # 9808) and piped onto the baking sheet.


Wednesday, October 17, 2012

Mui Fan (烩饭)

I seldom order Mui Fan when I eat at Cze Char stall. Cos I think we can easily cook this at home. I think it is an easy way to cook a one pot meal with whatever ingredients you can find at home. I did my version one day when I am so lazy to think of a 1 soup 2 dish meal for dinner. Open up my fridge and found some sea cucumber, frozen mix seafood and some vegetables. Just nice for a seafood mui fan! You can also use chicken or pork too.

Ingredients:
1  Prawns
2  Frozen seafood mix
3  Sea cucumber
4  Vegetables (any kind will do)
5   A clove of minced garlic
6   Oil
7   Salt
8  Pepper
9  Cooked Rice
10 1 beaten egg
11  Some Water or chicken stock
12 Corn starch mixture

Steps:
1  Heat up some oil in the pan. Saute the minced garlic.
2  Add in all the seafood and saute for a while.
3  Add in the vegetables. Stir fry for a while.
4  Add in the water or chicken stock.
5  When the water starts to boil add in the salt than corn starch mixture to thicken the stock.
6  Add in the beaten egg and turn off the fire. When the egg gets 3/4 cooked you can scoop the mixture onto the cooked rice.
7  If you like you an add in a dash of pepper before you serve.

Tuesday, October 16, 2012

枸杞叶肉丸汤


有两道汤我好久没有喝了。第一道是老黄瓜汤,第二道是枸杞叶猪肝汤。在这里的华人超市完全找不到这两样食材。没想到那天竟然让我无意间找到枸杞叶!真是太高兴了,马上买了回家煮汤!

以前妈妈煮枸杞叶猪肝汤,我就会很期待。因为有我喜欢吃的猪肝!枸杞叶和猪肝是绝配。 可惜先生不吃猪肝,所以只好用肉末做成肉丸煮汤。枸杞叶令我印象深刻的是它有非常多的刺。每次帮妈妈摘枸杞叶时都要小心翼翼。不然一个不留神,就会被厚厚的刺扎到手,还蛮痛的。不过,这里卖的枸杞叶虽然还是有刺但是却小很多。

这次一煮好汤,马上忍不住喝了一口。那熟悉的枸杞叶汤的味道真是令我想起妈妈煮的汤!

食材
1  枸杞叶(摘下叶子,冲水沥干水份)
2  肉末150克
3  枸杞
4  鸡蛋一颗
5  盐

步骤:
1 肉末先用酱油,胡椒粉,太白粉调味。
2  将锅里的水烧开后,将肉末做成肉丸放入水中。盖锅盖,焖一下。等水再次煮开后,加入枸杞叶和枸杞。
3  等肉丸熟了,加盐调味。然后加入蛋液。
4  蛋液变成蛋花后,就可以关火盛盘。


粉葛花生瘦肉汤


粉葛也称为葛根。我妈妈第一次煮这个汤的时候,我就爱上粉葛甜甜的味道。这道汤不但好喝,更重要的是吃粉葛对身体有非常多的益处。查了查医学百科网站,粉葛能防治心肌缺血,心肌梗死心律失常高血压动脉硬化等病症。还有它能降糖降脂,用于治疗高血糖,高血脂病症,有显著疗效。

要去除粉葛厚厚的皮非常不容易,所以当你用刀削皮时要小心手。我妈妈一般上煮粉葛汤时不加花生。这次我加了花生,增加了另一种层次的味道,使汤更甜。

食材:
1  粉葛一个,去皮切块
2   花生
3   瘦肉(排骨也可以)
4   红枣去核

步骤:
1  瘦肉先用滚水川烫。捞起备用。
2  将大概6碗水煮开,然后加入所有材料。
3  等水再度煮滚,转小火煮大概1 1/2 至2个小时就可以了。


Tuesday, October 2, 2012

Ngoh Hiang 五香

Have been too lazy to cook anything special and posting it here. And I am hooked to a new hobby ---crocheting, recently. That's why I had been quiet for the past 1 month. Time flies it's October now! Luckily this year it had been a quiet hurricane season here in Houston. I can feel Autumn coming (actually officially it is Autumn)with some cool weather approaching here---finally!

 I have cooked this Ngoh Hiang quite some time ago. I wouldn't say it is a success cos from the picture you can see that I did not managed to roll it tightly and nicely plus looks a bit burnt ;p But taste wise still ok a nice five spice powder aroma. There is a Hokkien and Teochew Ngoh Hiang recipe. I followed the Teochew one as I like to have yam in it. I will add more water chestnut next time to add more bite to it. The dried beancurd sheet which I bought here seems to be different from those sold in Singapore. It is not salty (which is good) but it seems to be harder and tougher which makes it hard to make it into a roll. Or maybe I lack the skills haha! 

The recipe I have adapted from Cuisine Paradise(http://ellenaguan.blogspot.com/2010/05/teochew-ngoh-hiang.html). Do take a look at her website as she has detailed instructions and photos to guide you.

The changes I made is that I did not add carrots and the fried onions. As mentioned in her website, if you make a big batch like me and intend to freeze please remember to wait for it to cool down before putting in the freezer. I have wrapped the Ngoh Hiang individually in plastic wrap so that they will not stick together when frozen. 

I have tried to use the oven to bake the Ngoh Hiang too (to lazy to deep fry and do the cleaning work later), actually it also can be pretty crispy on the outside! I have sprayed some oil (I use those baking sprays) on the ngoh hiang and put them on the baking tray to bake at 350 F for 10- 15 min or until you see the Ngoh Hiang turns slightly brown.   Oh before I forget you must defrost them before you bake them. It is a lot of work making them but I think it is worth the effort. You can make more and froze them. When you have a carving for it just dump them in the oven and you can enjoy it after 15 min! :)

Raw Ngoh Hiang. Looks ugly right! My wrapping skills really needs more practice


Tuesday, August 28, 2012

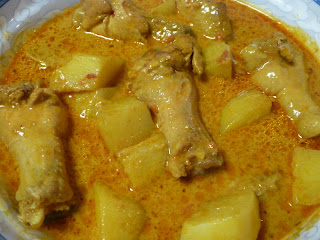
Chicken Curry


Usually when I crave for curry chicken, I will buy prima deli's chicken curry mix. It is the best I have eaten so far and I can get it from the supermarket in Chinatown! Ever since I have learnt to make my own Sambal chilli paste, I have tried to make my own curry from scratch. This year when I went back to Singapore, my mother-in-law bought me 5 packets of meat curry powder and seafood curry powder each. I have so many in my pantry now! Have been trying to use up the curry powder but I don't think I can ever finish!

My neighbour has been giving us gumbo which he cooked for a few times already. He and his father can cook the best gumbo! Even much better than the restaurants! We are really pai sei (embarrassed). Therefore I decided to cook chicken curry for them as they love curry!  It is really not difficult to cook chicken curry from scratch. Just that you will need the time to chop the ingredients for the chilli paste. You can refer to my previous post on how to make the spice paste.

Ingredients: (serve 4 to 5)
1    Chicken wings and drumlets (you can use whole chicken too)
2    4 medium size potato  cut into chunks
3    3 tablespoons of spice paste (the recipe is for cooked spice paste, you can don't cook it too. This time I did not cook my paste)
4    4 tablespoons of curry powder
5    1 can of coconut cream (I can only get can coconut cream here. you can get fresh coconut and squeeze the juice to make curry too. it is definitely better!)
6    Water (around 6-8 bowls or till the water covers the chicken)
7    3 tablespoon of oil
8    Some salt and sugar

Steps:
1    Heat up oil in the pan. Add in the spice paste and saute till you see the oil seperates from the paste or when the paste turns a darker colour. Note: Use medium heat so as not to burnt the paste.
2   Add in the curry powder and saute till fragrant.
3   Add in water and stir well.
4   When the water boils, add in the chicken and potato.
5   Simmer till the chicken is cooked and potato is tender.
6   Add in the coconut milk, salt and sugar.
7   When the curry starts to simmer, you can turn off heat and serve.

Note: I have marinated the chicken with curry powder overnight. you can skip this step if you are lazy.


Sunday, August 26, 2012

Updated Version stir fry ladies finger (Okra) with belachan chili and Steam fish


I had a recipe for stir fry ladies finger in my previous post. After my friend ww saw that she told me another way which her mum will cook it. Her mum will pound the dried prawns with the chilli to form sort of a paste. I think it sounds good. This time I have added toasted belachan (I took a piece of belachan and toast it in the oven for a while) and pound it with dried prawns and chilies to cook it with the ladies finger. This version is of cos more yummy as the belachan adds so much fragrance to the dish. You can refer to the old version recipe on how to cook this dish. The difference is that I just added the pounded mixture to the pan to stir fry.

Besides having the ladies finger for dinner, I also steam a fish (Hong kong Style) for dinner too. It is pretty simple. Just steam the fish with ginger and scallions. Meanwhile I added 1 1/2 tablespoon of good soya sauce, some sugar, and 1tablespoon of water in a bowl and heat it up in the microwave till hot. When the fish is cooked, pour away the water accumulated in the plate, the scallions and ginger after steaming the fish. Add some ginger and scallions cut into thin strips onto the fish. Pour about 1 tablespoon of oil (I use shallot oil which I kept after frying the shallot) in a bowl and microwave till hot (be careful when doing this). Pour the hot oil onto the fish followed by the soya sauce mixture. And voila you can enjoy a great meal!


Wednesday, August 15, 2012

粒粒--一道不知什么名字的菜


粒粒--必须用广东话讲哦!记忆中妈妈就是这样称呼这道菜。我想是因为所有材料都切成一粒粒,所以菜名就这样来的。我不知道这是不是妈妈“独创”的菜肴。不过,我好像真的没有看过这样的菜。我觉得如果吃粥的话,配上这粒粒真是非常搭。喜欢吃菜脯的朋友,你应该也会喜欢吃这道菜。下次如果煎菜脯蛋还剩下一些菜脯,不妨尝试煮这道粒粒!

材料:
1  菜脯 (我买已经切成丁的)
2  长豆或四季豆, 切成小段
3  豆干 切丁
4  麻辣花生或腰豆(花生口味随你的口味可以变化。妈妈版的粒粒用的是腰豆但是我找不到所以用花生)
5  豆瓣酱一汤匙(dou cheong)
6  糖少许
7  蒜茸少许
8 油

步骤:
1  用油煸炒豆干至稍微焦黄,然后捞起备用。
2  用油炒香蒜茸,然后加入菜脯炒香菜脯。
3  加入长豆,炒至8分熟。然后加入豆瓣酱和糖炒出豆瓣的香味。
4  加入豆干将所有材料炒均匀。
5  盛盘之后,加入花生就可以吃了!


Saturday, August 11, 2012

Chai tou kuey & Bak Chor Mee --- Our way of celebrating National Day


This post is 2 days late. But nevertheless I still want to wish Singapore a Happy 47th Birthday! We had been missing all the excitement and songs for national day for 3 years already. This time, I have decided to celebrate with 2 Singapore dishes which are commonly found at hawker centers. And I must say they are our favourite food! Each year when we went back to Singapore, the first meal which we will have is bak chor mee! We really really miss this yummy noodles! The next is chai tou kuey. The other famous food like chicken rice, laksa, chao kuey teow etc can be found at the malaysian restaurants at Chinatown in Houston. But we can never find these 2 here.

I have tried to cook bak chor mee before. This is my 3rd attempt. We can never mind the type of noodles which taste like those in Singapore. So though it does not taste exactly like the bak chor mee in Singapore but we are pretty satisfied with our version. My husband will usually eats a second round whenever I cook this.

For the chai tou kuey, I have left over radish cake which I have made 1 day ago so I have used it to cook this dish. Originally the chai tou kuey is plain without the chinese sausages, dried mushrooms and dried shrimps. But I am too lazy to make another plain one for this dish. It taste good too! This is my first time cooking this. I like to eat chai tou kuey which is the black type and a bit chao da. So you can see from the photo that some are chao da. Should have added more eggs but I ran out of it, if not it will taste and smell better with the fragrance of the fried eggs.

Overall we had a satisfied meal on National Day! But our minds are still thinking of the real bak chor mee and chai tou kuey in Singapore!

For the recipe of Bak chor mee I have found this recipe from http://foodmadewithlove.wordpress.com/2009/09/20/bak-chor-mee-mince-meat-noodles/ .  Just some minor additions :1) For the stewed mushrooms, I have added a little rock sugar when stewing.  2) Instead of chilli oil, I have used shallot oil which I have reserved from frying the shallots. And I have used sambal belachan chilli which is a must for me to add in the noodles besides the vinegar. I use Zhenjiang vinegar as I like the fragrance and it has a rich taste too.

For the recipe of Chai Tou Kuey this is the recipe I have found : http://rasamalaysia.com/fried-radish-cake-recipe/ .


Wednesday, August 8, 2012

Radish Cake 萝卜糕

I have been so lazy and tired recently. Just don't feel like doing anything at home. Guess it's the weather which makes me so lethargic It's so hot and getting humid here in Houston. Everyday's temperature almost hit 37! Therefore I try to cook simple dishes everyday. Nothing new. Therefore nothing much to post recently.

Just back track a bit, 2 weeks ago my husband, a Singapore friend and me finally drove to New Orleans for a short weekend getaway. We have been wanting to go there to try the best cuisine in America. New Orleans is famous for Mardi Gras and the cajun and creole food. We tried jambalaya rice, crawfish etouffee, gumbo, authentic southern breakfast at Mother's World best baked ham restaurant, french donut at the famous Cafe Du Monde and of cos the fresh seafood! Every meal is a satisfied meal! 

French donut at Cafe Du Monde. Basically it taste like ham jim bang (咸煎饼)without any filling but instead topped with lot's of powdered sugar. Their coffee taste like Hong Kong's coffee which has lot's of milk.

Famous Seafood Gumbo served with rice

From right to left: crawfish eutoffee, rice to go with the main course and red bean rice.

I love all their food cos it's full of gravy! haha I am just crazy over food with gravy!

Okie back to the radish cake which I tried to make yesterday. I got the recipe from http://en.christinesrecipes.com/2009/01/chinese-new-year-turnip-cake.html. You can check it out at this website. Christine had pictures and detailed steps and useful tips to make a good radish cake. I just tweak a bit with the ingredients. I omit the chinese bacon and add in dried mushrooms. 


I find it is still not as soft as I would like it to be. I think I should add more water as the radish I bought is not juicy enough. I have some leftover and I have use it for another dish to celebrate Singapore's National Day. Can you guess what dish it is? I shall post the recipe tomorrow ;)


Friday, July 20, 2012

蛋包饭

这个蛋包饭跟在餐馆的是有点不一样。我指的是形状。我的是像信封哈哈!就是没有办法把用蛋皮把饭包得鼓鼓的。蛋皮里面不可以放太多饭,不然很难用蛋皮把饭包起来。不知道日本餐馆是不是用特别的锅做蛋包饭呢?

其实,我不特别喜欢吃蛋包饭。如果在日本餐馆吃饭,这道菜绝对不是我的首选。我只是想除了一般的扬州炒饭,还有什么特别的炒饭可以尝试煮一煮。虽然蛋包饭严格来讲不是炒饭类,不过饭也还是要用番茄酱炒一炒才算是蛋包饭。

蛋包饭里的饭不难做。比较难的是那个蛋皮。要有耐心和“铁沙掌”;p 因为等蛋皮煎好后,还是要用手把热腾腾的蛋皮包住饭。当然可以用锅铲代替,但是我觉得用手最容易。如果你想“挑战”自己,不妨尝试做蛋包饭。

食材:(一人份)
1  隔夜饭 一碗
2  肉末或切成小块的鸡腿肉(可以用酱油麻油等腌一下)
3  1/4 洋葱切成丁
4  新鲜蘑菇切成丁
5  四季豆切成丁
6 番茄酱1大匙
7  盐一小匙
8  糖一小匙
(炒饭的材料可以随你喜欢更改)
9  3颗蛋打散加点盐和太白粉水 (太白粉水一点就够,它可以让蛋不容易破)

步骤:
1 热锅加油炒香洋葱。然后顺序加入四季豆、蘑菇和肉。
2 等到肉已经有点白色,加入番茄酱、盐 和糖炒一下。
3 加入白饭。把所有材料和饭炒均匀。还有要把饭炒散。根据个人口味,如果你喜欢多点番茄酱可以加入多点。
4 把炒好后的饭盛盘备用。
5 用中小火热锅,加入油。把蛋液慢慢倒入锅里煎成蛋皮。不要用太大的火不然蛋皮很快就煎焦了。用小火慢慢煎,时不时转动锅时蛋液均匀分布在锅里,形成一片厚度均匀的蛋皮。
6  等到蛋皮大概8分熟的时候,把炒好的饭放在蛋皮的中间。用锅铲把旁边的蛋皮掀起来,然后好像包薄饼一样把饭包起来。
7 盛盘后,挤一些番茄汁在蛋皮上面就可以吃了!


Thursday, July 19, 2012

Steam fish fillet rolls with prawn paste


This is a dish I came up with last minute. I had bought 2 flounder fillets but just cannot make up my mind on how to cook with it. Actually I thought the best way was to coat them with either flour or breadcrumbs and deep fry it. But I felt like eating a more healthy and less clean up of the kitchen version. I can just steam it the Hong Kong way with some soya sauce and ginger slices. But I don't think it will taste good for this type of fish.

Search my fridge and found some left over prawn paste which I bought some time ago. Better use them up before I forgot about it. That's how my version of this dish came about.  I combined the 2 ingredients with some vegetables for some crunch. It is another simple dish!

Ingredients:
1  2 Fish fillets cut into 15cm length
2  Prawn paste about 200g
3  2 Mushrooms soaked in water till soft and cut into thin strips
4  1/4 of a carrot cut into strips
5  1celery cut into strips
6  salt
7  pepper

Ingredients:
1 Season the fillets with some salt and pepper.
2 Smear some prawn paste onto the fillets. Do not put too much if not it will be difficult to roll it up later.
3 Add in the mushroom, carrot and celery at one tip of the fillet.
4 Slowly roll the fillet into a roll.
5 Steam it under high heat for about 10 minutes or until the fillets are cooked.


If you want you can make a sauce for this dish. Next time if I am making this dish again I probably will make a sauce with some soya sauce, sesame seed oil and beaten egg than add some corn starch to thicken it and drizzle on top of this dish.


Tuesday, July 17, 2012

双味茄子--想念妈妈的蒸茄子

我记得妈妈偶尔会煮茄子。她会将茄子切半然后拿去蒸。蒸好后用汤匙将茄子的肉刮出来用蚝油、胡椒粉、麻油和油葱酥拌在一起。有时候她还会撒上一些葱或芫荽。这是很简单的一道菜,但是却是我最喜欢的菜色之一。我最喜欢叫妈妈放多点胡椒粉和油葱酥。这两样和蒸好的茄子拌在一起是绝配!每一次她煮这道菜我一定是忠实的支持者。我看家里好像只有我和妈妈喜欢吃蒸茄子。如果家里人吃不完,我会把剩下的全塞进肚子里,哈哈!
吃了一口蒸茄子,马上想起那怀念的味道,真满足!
烤茄子,我先生喜欢的版本

我也有好长一段时间没有煮这道菜了,因为家里的老板不喜欢吃这样煮的茄子。没有法子,只好不煮了。最近我在网上发现了煮茄子的新方法。那就是将茄子拿去煎(我用烤的方法),然后淋上甜酱、新鲜辣椒和油葱酥。我煮过一次,老板觉得不错。嘻嘻,所以我这次决定用买回来的一半茄子做我妈妈味道的蒸茄子,而另一半就做老公喜欢的口味。这样就皆大欢喜了!

皆大欢喜!
你喜欢吃哪一种呢?不妨试试看,然后告诉我!

Saturday, July 14, 2012

Missing my mum's dishes again--- Steam egg tofu with minced meat

Another dish I look forward to whenever my mum cooks this. This is a simple and healthy dish. Sometimes my mum will use normal tofu instead. But I still prefer to eat egg tofu. You just need to get minced meat and marinate it with some oyster sauce, white pepper, sesame seed oil, corn starch and shaoxing wine. I will add in chopped spring onions and water chestnuts. If you have some prawns at home, you can also chopped the prawns into small pieces and add in to the minced meat. Cut the tofu into slices than add the minced meat on top of the tofu and steam it on high heat for about 15 minutes or until the meat is cooked. Just as simple as that and you can have a nice dish!


Tuesday, July 10, 2012

健康版的蟹黄豆腐


那天在冰冰好料理的节目中看到厨师煮蟹黄豆腐这道菜。我马上被蟹黄所吸引。当我仔细看节目,原来厨师是用红萝卜取代蟹黄,煮一道健康、美味又便宜的料理。有些做法是用咸蛋黄取代蟹黄。但是,咸蛋黄也是有一定的胆固醇。红萝卜不但颜色像蟹黄,也有丰富的营养。这道菜太适合我了!为了增添鲜美的味道(因为不加蟹黄,就必须加入其他的材料弥补不足),厨师用了虾皮。但是我用了樱花虾,因为我家里还有一大包。而且樱花虾的鲜味比虾皮浓。我对“成品”还颇满意的,用红萝卜煮的蟹黄豆腐还是鲜甜可口而且又健康!

食材:
1  嫩豆腐一盒,切成小块
2  绞肉大概200克,用酱油、胡椒粉腌制
3  樱花虾或虾皮或虾米,切成成小块(如果用虾皮就不需要切)
4   红萝卜一条,去除皮然后用汤匙刮成丝
5  蚝油1汤匙
6  麻油少许
7  高汤半碗
8  油2大匙
9  葱花少许


步骤:
1 热油锅将油倒下去。然后加入红萝卜丝用中小火炒至红萝卜素已经渗入油里。油会变成红萝卜的颜色。取出备用。
2  用油炒肉末。把肉末炒散,然后加入樱花虾炒一下。
3  加入炒好的红萝卜和蚝油调味炒一下。
4  加入高汤和豆腐。
5  盖锅盖焖大概5分钟。
6  如果你喜欢浓一点的汁,可以勾芡。起锅前,加入麻油和胡椒粉。
7  盛盘后,撒上葱花。


Monday, July 2, 2012

Missing my mum's dish--- Stuff squid with minced meat


One of my friends is complaining about why I am so slow in posting new dishes. Ops sorry because I was "addicted" to crocheting for the past few weeks. I am still cooking 6 days a week hehe!

Just feel like cooking this stuff squid with minced meat when I see some pretty fresh squid in the supermarket. My mum used to cook this dish once in a while. And I really look forward to dinner whenever she cook this. As my dad has high cholesterol my mum seldom cook squid and prawns. I have inherited my dad's high cholesterol therefore I seldom cook and eat prawns and squid too. But once in a while I will still pamper myself in these seafood.

This is a simple dish. You can buy squid which has already been cleaned or you can cleaned it yourself. My mum usually will just steam the stuff squid but for me I have added a sauce to it. Hope you like this dish :)

Ingredients:
1) 4 big cleaned squids or 8 medium ones
2) 250-300g of minced meat
3) Water chestnuts chopped into small pieces
4) Oyster sauce
5) white pepper
6) Shaoxing wine
7) Sesame seed oil
8) 2 tablespoons of Spicy bean sauce (辣豆瓣酱)
9) A dash of sugar

Steps:
1) Add the water chestnut in the minced meat and marinate the meat with some oyster sauce, sesame seed oil, Shaoxing wine and white pepper. Marinate for at least half an hour.

2) Stuff the squid with the minced meat. Do not stuff the meat all the way to the top of the squid because when the meat is cooked it will increased in size. If you stuff too much meat the meat will pop out of the squid. For the tentacles of the squid, stuff it on top of the squid and use a toothpick to secure it the squid.

3) Heat up the water in the steamer and when the water boils, add in the squid to steam for about 15 minutes or till the meat is cooked.

4) While steaming, mix the spicy bean sauce and sugar in a bowl. Use the microwave to heat the sauce. You can also heat it up in a wok. I am just lazy so I use the microwave ;p

5) When the stuff squid is cooked, pour the sauce on top and you can add in some chopped spring onions.


Friday, June 22, 2012

荷叶蒸鸡


家里还有很多荷叶。它们都是上次做荷叶饭剩下的。我怕放太久会有虫,所以想尽办法用完它们。如果再做荷叶饭,我又很懒;p 想用它们做即简单又好吃的菜。突然想到不如做荷叶蒸鸡。印象中好像有这道菜。上网找了找,很容易就找到食谱。但是都是很多功的菜,不适合我;p

我就只好凭自己的“想象力”做荷叶蒸鸡。我记得以前妈妈喜欢用红枣、黑木耳和金针(好像还有冬菇)蒸鸡。不如我就用同样的方法煮,但是用荷叶包起来然后才拿去蒸。家里没有金针,我就不放了,我改用枸杞子。只有我和先生两个人吃,我就买了一只小春鸡。我把它洗干净抹干,并切成4大块。我用花雕酒(大概两至三汤匙)、盐、沙姜粉(如果没有可以不放)、酱汁腌制大概1小时。我觉得时间还不够,下次我会腌更久。黑木耳、冬菇用水浸软。如果你的冬菇和黑木耳是用大朵的,那就要切小块点。红枣把核去掉用水洗一洗。枸杞子也是要用水冲洗一下。荷叶用水浸泡软然后抹干。

把荷叶摊开,放在碟子上。把所有材料放在荷叶上(包括腌制的汁),然后把荷叶把材料包起,用绳子绑好。等蒸笼的水煮沸,把荷叶鸡放进去蒸大概半小时或等到鸡熟透久可以了。

蒸荷叶鸡的时候,整个家里充满荷叶的清香味!我这次没有把鸡腌很久所以还不够入味。不过,这道菜属于清淡的菜。喜欢重口味的朋友可能不太喜欢这道菜。如果你觉得要切整只鸡很麻烦,可以用鸡腿取代。吃着这道菜又想起妈妈以前煮这道菜的味道!


粽子飘香的节日--想念妈妈包的粽子


这个星期六就是端午节了! 虽然远在美国但是似乎可以到妈妈包粽子的味道。妈妈每年都会亲自动手包咸肉粽和碱水豆沙粽。小时候我就会帮妈妈挑包碱水粽的糯米。好花时间啊!虽然妈妈每年包粽子但是只是让我看,总不让我动手。她怕我包不好,等一下煮粽子时会全散开。所以到现在为止,我只有个大概的概念怎么包。

去年的端午节,我和邻居到唐人街买东西时看到到处卖粽子但是价钱小贵了些,所以我们便心血来潮打算亲自动手包粽子。问题是我们两个人都没有包粽子的经验!所以只好到网上找教包粽子的录像做最后“恶补” ;p 我们这次决定包咸肉粽材料有:绿豆(做甜品dousuan豆爽那种)、五花肉、冬菇、腊肠、和咸蛋黄。

糯米要洗净然后浸泡一个晚上,然后沥干水份。绿豆也是和糯米一样处理。冬菇泡软备用。粽叶泡软一个晚上洗净备用。五花肉切块用蚝油、胡椒粉、麻油、酱油腌一个晚上。腊肠切成厚片。先热油锅爆香冬菇,然后盛起备用。然后把糯米加入锅里炒一下,加入五香粉、酱油、胡椒粉炒至均匀,盛起备用。然后继续用锅炒五花肉至六七分熟就可以盛起备用。

将粽叶交叠做成漏斗状,盛入糯米、绿豆、五花肉、冬菇、腊肠和咸蛋黄,再盖上糯米然后包起来,入锅煮1个小时。

看文字描写包粽子好像很容易,其实一点都不简单。我和邻居包的粽子样子很丑,哈哈!一定要把所有材料包得扎实,手要抓紧。绑的时候更是要绑紧。这里推荐一个网站,http://kitchentigress.blogspot.com/2012/06/kee-chang-video.html。博客的主人很好心的把包粽子做成录像。录像是教大家如何包碱水粽。

挑一些还像样的拍个照


今年,太懒了,所以不包粽子。想吃的时候就只好花钱解馋;p!

Monday, June 18, 2012

Grilled Seafood Patties


I have bought this grill pan and has been using it to grill my salmon and meat. I love the pan! It is non stick and easy to clean. This time I will use it to grill patties. Saw this seafood on lemongrass recipe at http://wokkingmum.blogspot.com/2008/08/grilled-seafood-on-lemongrass.html. I have make some changes to the paste recipe. I am using the rempah (spice paste) I had made some time ago in making this seafood patties. The recipe for the rempah is as follows:


Ingredients: (recipe from http://www.thelittleteochew.com/2009/09/rempah-encore.html)
Lengkuas (aka Galangal): ~200g
Young ginger: ~100g
Turmeric: ~50g
Shallots: ~750g
Candlenuts: ~100g
Dried red chilli: ~30g
Lemongrass: ~7 stalks
Fresh red chilli: ~450g
Garlic: ~1 bulb
Salt: ~1 1/2 tsp (add when you are frying the rempah)
Sugar: ~1 tsp (add when you are frying the rempah)
Vegetable oil: ~1 rice bowl (for frying the rempah)

1  Pound/blitz the ingredients, adding vegetable oil in small quantities gives you a smoother blend. No measurements for this ... just pour a little here and there as you pound/blitz.
2 Fry over a low flame for about 1 hour, stirring all the time, until the oil floats to the top. Cool completely before scooping into a sterilised container. Freeze.

This recipe for the rempah will make quite a bit of spice paste. Since you spend so much time in pounding (for me I  pound) and frying it might as well make a big batch and freeze it so that you won't have to go through all the hard work again when you need it.

Okie now for the recipe for the seafood patties:

Ingredients:
1  150g Prawn (after shelled), minced
2  150g Fish Paste or fillet (after skinned and debone), minced
3   3 tablespoon of spice paste. If you want it to be more spicy you can add more

Steps:

1  Mix prawn and fish paste together
2  Mix cooled spice paste with prawn and fish paste.
3  Oil your hands and scoop some mixed paste.
4  Roll it into a ball than press it to form a patty
5  Heat and oil the grill pan.
6  Grilled them till completely cooked.
7  Serve.


It's sort of a healthier version of a otah as it does not have coconut milk. I husband actually prefer this to otah! ;)