Wednesday, May 30, 2012

Kaya


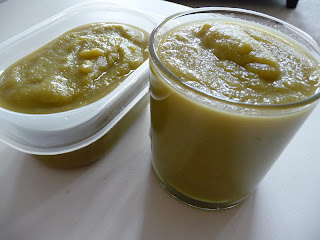
A group of my friends will be gathering at my place for brunch. We try to meet once a month. And every gathering we have a theme. This month of May, Janet had some vouchers for bagels. She is very kind to use her voucher to get us 12 yummy bagels from Einstein Bagels near our place. Therefore, she suggested the theme to be "Spreads" to go with the bagels. I have decided to make Kaya.

This is my third attempt. Each attempt seems to be better, looks like I have get a hang on how to make the correct consistency.  The first try it ended up pretty lumpy. I guess I was too impatient and had the water bath too hot so the eggs in the kaya mixture became cooked and thus lumpy. The second try I used another recipe and decided to sieve the mixture. It is less lumpy than the first try but still not as good as I would love it to be. This time I train myself to be more patient in stirring continuously under slightly lower heat of the water bath.

This batch of kaya I have used less brown sugar cos I had run out of it and had to use white caster sugar. I prefer to use brown sugar as it gives the kaya a richer flavour. I could only get frozen or especially old pandan leaves here. I have tried to use both to make kaya before but it does not give that nice pandan aroma. This time I did not have the time to buy it at chinatown therefore I use pandan paste and pandan leaves extract. I think the result is about the same as using fresh pandan leaves. Of cos using fresh natural leaves are still better than using pandan paste as they are natural.


Ingredients (Adapted from Nasi Lemak lover's website)

1  3 large eggs (lightly beaten)
2  250g caster sugar (can reduce to 200 if you don’t like it too sweet. I prefer to use brown sugar)
3  350ml coconut milk (I can only get canned coconut cream here so I use that)
4  8pcs pandan leaves (I use pandan paste and pandan leaves extract) 
Steps:
1  Mixture A - Blend pandan leaves and coconut milk in a blender. Strain to discard pulp. (I skip this step and added pandan paste into the coconut milk. )
2  Mixture B - Add sugar into beaten eggs, use a hand whisk to stir mixture until sugar dissolves (Do not beat but lightly stir !!)

3  Add mixture A into mixture B became kaya mixture. Stir and mix well.
4  Sift the kaya mixture into another mixing bowl (stainless steel preferred).
5  Place mixing bowl over another pot of boiled water on low heat (real small bubbles bubbling will do. The 1st time I make i think the water is too hot and the kaya becomes lumpy), stir kaya mixture occasionally.(Do not stop too long, 1-2mins intervals)
6 It took at least 1hour to cook till desired thickness.(I took around 30-45 minutes though) Cool completely before store in a clear jar and keep in the fridge.

This is the kaya I made for the first time. Using brown sugar gives it a brown colour.


菜尾 Chai Buey


刚从黄石国家公园回来,那里天寒地冻。但是一下飞机抵达休斯顿却感觉泡在三温暖里--热极了!不过,我还是比较喜欢暖和一点的天气;p在黄石国家公园一下子下大雪,一下子下冰雹,一下子下大雨的,我还是头一次遇到这样奇怪的天气。对于我来说实在很冷,有时遇到什么动物或看到什么美丽的风景(其实也看不清楚因为下雪景色朦朦的)都冷到不想踏出温暖的车外。我就把相机递给我先生叫他帮我拍个照。

这么冷的天气,实在很想喝个热汤。但是我们去的餐厅都找不到热腾腾的汤。只有早上吃早餐时,就点了带有淋上浓汁的早餐松饼。第一次点麋肉做的香肠碎肉,还蛮好吃的。
我先生点的早餐。他的还有在早餐松饼(biscuit)上加入cheese, 很好吃!
我的早餐。松饼上淋上热热酱汁,温暖极了!

这就是麋鹿。


回家后好想吃中餐!虽然在黄石公园吃了两顿中式晚餐,但是价钱实在贵而且味道一般。我太懒了不想煮平时的一汤两菜。我决定煮“一锅熟”的菜,简单方便。打开冰箱,看到上次买的小芥菜还没有煮。太棒了,可以煮菜尾!其实我还没煮过,不过查了查一些食谱大概有个概念。我们一般叫做Chai Buey。每个家庭的“秘方”都不一样。其实我妈很少煮这道菜。因为家里人都不喜欢芥菜的味道。芥菜有种很特别的苦味,不是每一个人都能接受。那天我看到超市卖小芥菜便买了些,就想做菜尾。

一般上,菜尾也加入咸菜和大节庆时吃剩的烧鸡、烧鸭或烧肉。我家没有这些所以就做了些调整,加入冰箱有的材料。如果你们家有这些材料一定要加入,味道会更好。虽然没有汤,但这道菜有汁、有菜、有肉,又酸酸辣辣的,很下饭喔!


材料:
1  芥菜 (小棵的大概4-5棵,大棵的一棵)把芥菜洗干净然后切块
2  鸡腿肉 一个 切块
3  冬菇 6-8朵,泡软。泡冬菇的水留着
4  竹笋 (如果没有可以不放),切片
5   红萝卜半条,切片
6   番茄一个切块
7  Assam 水 一杯
8  咸酸梅 1粒
9 干辣椒 5条
10  豆瓣酱2-3汤匙
11   水或高汤5碗


步骤:
1   热锅加点油把鸡肉炒一下。然后加入豆瓣酱炒一下。
2   加入水和其他材料用中小火焖大概45分钟。
3   如果不够咸可以加些盐调味。


如果吃不完放隔夜味道更棒!我参考了http://www.petertan.com/blog/2010/06/21/chai-boey-heaven-in-a-pot/ 这个网站然后做了些调整。如果想看更正宗的做法不妨参考这个网站。


Thursday, May 17, 2012

白果薏米腐竹糖水


今年的夏天来得很早,四月天温度就已经差不多高达26-29度。现在已经五月了,温度已经超过30度!是时候煮一些滋润的糖水了。上次买的白果煮了汤,还剩下很多。我就把它们放在冰箱的冰冻格。现在正好可以派上用场!

我家婆每年年初一都会煮这个糖水。她还会加入鹌鹑蛋---我的最爱!这次我忘了买不然我一定会放的。以前我不喜欢吃白果。很奇怪来到美国很多我不喜欢吃的东西反而变成可以接受了。好像葱、芫荽以前我是能不吃就不吃,现在我可爱吃呢。

对了,处理白果时不要忘了用牙签把带苦味的心给挑出来。不然就会吃到苦苦的白果,一点都不好吃!

食材:
1  白果
2  洋薏米 大概 1 至 1 1/2 汤匙 (用水冲洗一下)
3  腐竹大概3-4 条 (用水浸泡至稍微软然后切成小段)
4  鸡蛋2颗 (大概打均匀)
5  香兰叶 3-4 叶
6  8碗水(大概中型锅半锅水)
7  冰糖大概1把 (根据你的喜好加入)

步骤
1  将水煮开然后将所有材料(除了鸡蛋和冰糖)加入锅中用中小火煮到薏米和腐竹变软。由于加了薏米所以一定要看住火。如果火太大糖水很容易溢出来。
2 等到薏米变软后,加入糖。等糖融化后,加入蛋液。等蛋液变成蛋花就可以了。记得把香兰叶取出才盛盘。


Sunday, May 13, 2012

咸蛋蒸肉饼


在这里很难找到生咸蛋。就算有也未必新鲜。那天看到新鲜的生咸蛋马上买了回家。很想吃三黄蛋,但是家里的“老板”不是很爱吃所以就得想想看可以煮什么菜很像三黄蛋但是“老板”又爱吃的。 记得我家婆喜欢煮猪肉蒸蛋(她的蒸蛋是肉的分量比鸡蛋多),我先生还蛮爱吃的。我决定结合两者煮咸蛋蒸肉饼。虽然不是很正宗的咸蛋蒸肉饼,不过没关系,只要能满足我和先生的口味我就很高兴了!

食材:
1)咸蛋一粒
2)鸡蛋3-4粒
3)猪绞肉200克
4)葱半棵切成末
5)酱油少许
6)胡椒粉少许
7)绍兴酒少许
8)水或高汤4汤匙
9)姜汁少许
10)太白粉

步骤:
1)用酱油、胡椒粉、绍兴酒、太白粉及姜汁腌猪肉。腌大概半小时然后加入葱,搅拌均匀。
2)将鸡蛋和咸蛋白和水搅拌均匀。咸蛋黄可以切成小块加入蛋汁里。我为了美观所以没有把它切块。
3)将绞肉铺平在一个盘子上。然后将蛋液倒在肉饼上。
4)在蒸锅加入水。等水煮开,将盘子放进蒸锅用大火蒸大概15-20分钟,等肉熟了就可以了。


Thursday, May 10, 2012

Fried rice with XO sauce

Haha another recipe with my XO sauce. This time I use it to cook my husband's favourite dish---fried rice!

For the ingredients I use salmon and asparagus. You can use char siew if you like. It's basically very easy. I have added sambal belachan chilli too as I would like the fried rice to be more spicy. You can use overnight rice or you can cook the rice on the day and spread it out in a baking sheet and switch on the fan to cool and dry it up a bit.

Ingredients:
1  Salmon fillet cut into small chunks and marinate with some salt and black pepper
2  Asparagus 5 stalks, wash and cut into chunks
3  2 beaten eggs
4  3 bowls of cooked rice
5  1/4 brown onion cut into small pieces
6  XO sauce 2 tablespoons
7  Sambal belachan chili 1 tablespoon
8  Soya sauce 1 tablespoon

Steps:
1 Heat up some oil in the pan, add in the salmon and fry it until slightly browned. Scope it up and set aside.
2 Using the heated oil in the pan, add in the asparagus and stir fry for around 5 minutes. Scope it up and set aside.
3 Add in some oil and heat it up than add in the eggs and fry it till you can smell the fragrance of the egg. Note: keep stirring it so that it will not get burnt.
4 Add in the onions and stir fry it for a while. Than add in the rice.
5 Break up the rice in the pan if there are any lumps. Add in the fish and asparagus.
6 Add in the XO sauce and belachan chilli sauce. Mix them well with the rice and other ingredients.
7 You can add in some soya sauce if you want.
8 Once everything is well mixed you can served the yummy fried rice!


My husband still loves his favourite fried rice with salted fish. But who cares I find it quite yummy ;p

Saturday, May 5, 2012

XO 酱炒芦笋


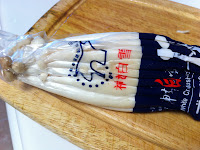
刚刚家里做好的XO酱正好拿来煮芦笋! 最近在超市看到一种新的菇类,很特别就买回来试试。我就拿来和芦笋一起炒。这种菇的口感很不错,如果你下次看到不妨买回来试试。

食材:
1 芦笋
2 白雪菇 (或任何你喜欢的菇类)
3 蒜茸
4 XO酱 2-3汤匙

步骤:
1 热锅倒入油爆香蒜茸。
2 加入芦笋和一点水炒一下。
3 加入白雪菇。
4 加入XO酱将所有材料炒均匀。你如果喜欢咸一点可以加入盐。
5 炒至芦笋熟了就可以盛盘。


Wednesday, May 2, 2012

Homemade XO sauce

XO sauce is a very good condiment to stock up in the fridge. I will use it to stir fry asparagus, long beans prawns etc. However it is a pretty expensive condiment. I have seen the recipe on the web and the cooking show on how to make one one at home. You will need a lot of time to get the stuff ready and to cook it slowly in the wok. I have copied down the recipe for some time but just too lazy to "challenge" myself into making it. Until one day, I have finished my store bought XO sauce and I guess it's time to try making my own version of it.

I adapted my version of XO sauce from 2 recipes. One is from 冰冰好料理, the other I have forgotten which website I have downloaded from (sorry for not acknowledging the source). The amount of ingredients listed will yield a small pot of XO sauce, which is a lot for me. I did not know that the ingredients listed in the recipe will get me such a huge amount of sauce until I have soaked up the dried scallops.  Well since the scallops have already been soaked might as well use all. Luckily I can keep the cooked XO sauce in the fridge. And I have given some to my neighbour. I guess I will have to think of more ways to cook with this sauce ;p

My one small pot of XO sauce

Ingredients

1   10 fresh red chilies
2   15 dried chilies – soak in hot water
3   200g dried scallops – soak overnight until soft
4   2 head of garlic - peeled
5   10 shallots - peeled
6   200g dried shrimp – soak in hot water until soft. Drain the water and use Shaoxing wine to soak it for a while.
7   150g Chinese ham - chopped into small pieces
8   100g sakura prawns (樱花虾) - optional, chopped into small pieces
9   2 tbsp spicy bean paste sauce (辣豆瓣酱)
10 2 tbsp sugar
11  ½ tbsp coarsely ground black pepper
12  2 tbsp oyster sauce
13 1 tbsp Chilli powder -- optional

Steps:
1. Drain scallops, tear them into fine shreds, pat it dry on paper towel and set it aside. Drain dry shrimps and chopped finely and set it aside.
2. Put the shallots in food processor and chop it finely. Do the same to the garlic too, remove and set it aside.
3. Remove the steam and seeds of the fresh chilies and dry chilies. Chopped it finely in the food processor and set it aside. 
4. Heat up about a cup of vegetable oil in a frying pan or wok over medium high heat. Add in scallops and frying it until crispy and lightly brown. Remove and set it aside. In the same oil, add in (accordingly): garlic, shallots, chinese ham, sakura prawns dried prawns. Stir constantly and cook until lightly brown. After adding each ingredient, stir fry until you can smell the fragrance of each ingredient than you add in the next ingredient. Be careful not to burnt the ingredients, you have to keep stirring.
5. Add in chilies and scallops. Lower down the heat and continue to fry for another 10 minutes. Add more oil if necessary. Stir constantly as it may burn easily.
6. Add in the seasonings. Continue stir fry until it is completely dry. Remove from heat and let it cool. 
7. Transfer to sterile jar and keep in the refrigerator.

Note: I have transfered the cool off XO sauce into a small pot and let it sit for 2 days before transferring them into jars. According to one of the recipes, this process will allow all the fragrances and seasonings to mingle and mix with each other. 


Mine is a bit dry compared to those sold at stores as I did not add a lot of oil. I find store bought ones are too oily. All together I have squeezed this pot of sauce into 6 bottles ;)