Monday, October 31, 2011

Ketchup Luncheon Meat with Potatoes 茄汁炒马铃薯午餐肉

 I was chatting with my good old friend WW on msn the other day. We are both true blue Cantonese. We often chat about the home cooked dishes our mums cooked at home. We found that our mums have quite a number of common dishes which they cooked. We were guessing whether these were common cantonese home cooked dishes.  One of these dishes is ketchup luncheon meat with potatoes. Once in a while I will crave for luncheon meat and my mum will cook this dish. Since my husband loves to eat luncheon meat and my pantry still has a few cans of it (which i stock up for hurricane emergency package)I shall cook this dish. 

After chatting with WW on how our mums cooked all these dishes, we found that there are still slight differences. The main ingredients might be the same but there will still be some slight differences in some ingredients. For eg my mum usually will add the frozen mixed vegetables (those with green beans, corn kennels and diced carrots) to add some colour. But WW's mum will cook this dish with baked beans. Yummy I love baked beans! Too bad I don't have that in my pantry, if not I will cook it with that. This time round i use celery to replace the mixed vegetables as I don't want to buy a big bag of it just to use a small amount to cook this dish. This is really a great dish to eat with rice. I think I can finish my rice just with this dish ;)

Ingredients:
1) Luncheon Meat half a can, cut into small cubes
2) 1 Potato cut into small cubes
3) 2 sticks of celery cut into small slices
4) 1 tablespoon of minced garlic
5) 3 tablespoons of ketchup 
6) 1 tablespoon of lemon juice (optional)
7) 1 teaspoon of sugar
8) 1 teaspoon of oyster sauce
9) 2 tablespoon of water

Steps:
1) Heat oil in a pan. Add in garlic and stir fry for a while.
2) Add in the potatoes and luncheon meat and stir fry.
3) Add in the celery.
4) Add in the ketchup, lemon juice, sugar, oyster sauce and water. Stir fry to mix the sauces and ingredients well.
5) Than cover the pan with the lid and simmer till the potatoes are soft and the dish is ready to serve!


Sunday, October 30, 2011

上海菜饭

我的邻居是上海人。在这个白人的地方能找到华人邻居真是很幸运!所谓: 独乐乐,不如众乐乐,有时候煮了一些美食要和其他人分享才有乐趣。她会做饺子和包子给我们吃(今天她就煮了冷面),而我就会煮一些新加坡的美食和她“交换”。我们偶尔也会一起做菜。好像今年端午节我们好想吃粽子但是又觉得外面卖的实在是又贵又不好吃,便决定自己包粽子。可是,我们两个都是“新手”不会包,便各自上网找如何包粽子的方法。虽然粽子样子包得难看,但是味道还是好吃的!

听她说上海的菜饭很香很好吃。那天刚好“吃饭皇帝大”就介绍如何煮上海菜饭。我马上就记下食谱。我又上网查看其他人怎样做这道菜。基本上,有些食谱用了简单的清江菜和咸猪肉或金华火腿作为主要材料。有些的做法用饭锅,有点像上次我介绍的电饭锅版的砂锅饭。我的做法就根据“吃饭皇帝大”的介绍,根据我加冰箱有的东西,再加减一些材料。我觉得有点港式口味;p 。我很喜欢这上海菜饭因为有菜、有肉也有海鲜,蛮营养均衡的一餐。很简单的一锅熟料理,一方面做给我邻居尝尝,另一方面让我老公换换口味,不要一直只会吃炒饭!

食材:
1)糙米2杯 (brown rice) 你也可以用一般香米。我家里只有糙米所以就用这个。另一方面吃糙米也比较健康。
2)腊肠2条切粒
3)清江菜6棵切丁
4)虾米一把,洗净后,用水泡至稍微软化,再用绍兴酒腌
5)冬菇7大朵,泡软后切丝
6)蒜茸一大匙
7)酱油少许
8)绍兴酒少许
9)胡椒粉少许

步骤:
1)要炒好吃的饭,一定要用隔夜饭。所以我前一天就煮好糙米饭。我把饭倒入大碗内,然后用保鲜膜盖住。这样会避免上面的饭粒变太干太硬。
2)起油锅热油,然后把菜倒入锅中快炒至八分熟。然后,盛起来备用。
3)用干锅炒香虾米。然后,加入油。等油热的时候,加入蒜茸炒香。
4)加入腊肠炒香。然后加入香菇炒香。
5)把饭倒入锅里,把饭粒炒散。
6)加入炒好的菜。
7)加入调味料。把调味料、材料和饭炒均匀就可以上菜了!


PS:如果你想用饭锅煮这道菜,就先把菜炒熟。然后炒香香菇、虾米和腊肠。用一般电饭锅煮饭的方式煮饭。把材料(除了菜)倒入饭锅里和米一起煮。等到饭煮好后,加入青菜和调味料。把所有材料搅拌均匀,就可以了。如果你懒惰,可以不炒香菇、虾米和腊肠就直接放入电饭锅里。青菜就用水川烫。但是一定要把水沥干。

Thursday, October 27, 2011

Stir Fry Sweet Potato Leaves with Fermented Bean Curd 蕃薯叶炒豆腐乳


This is another green vegetables which I love to eat. Miss my mama's way of cooking it with fermented bean curd. The vegetables which I can find in the supermarkets here are usually much larger in size than those which I eat in Singapore, which means that they are pretty "old" and usually not as tender. This is one of the few veggie which is actually smaller in size than those found in Singapore! But than, the stem (which I prefer to eat) is not as juicy as those in Singapore.  Searched the net for some nutritional facts about this veggie. They are pretty rich in many nutrients. This is what I have found : This food is low in Saturated Fat, and very low in Cholesterol. It is also a good source of Vitamin E (Alpha Tocopherol), Niacin and Phosphorus, and a very good source of Dietary Fiber, Vitamin A, Vitamin K, Thiamin, Riboflavin, Vitamin B6, Folate, Magnesium, Potassium and Manganese.
Read More http://nutritiondata.self.com/facts/vegetables-and-vegetable-products/2946/2#ixzz1bztEpA6I

Sweet Potato Leaves
I have cooked it like my mum's way using fermented bean curd. I love fermented bean curd! Just add some sesame seed oil and a little sugar on the cubes and eat it with porridge is just yummy! Sometimes I will just ask my mum to serve the bean curd as one dish to eat with rice hehe! If you don't fancy the bean curd you can use lot's of garlic and chillis to stir fry it. Oh and samba chillis will be a great way to cook it too!

Ingredients:
This is my favourite brand of fermented bean curd. Full of flavour! I have recommended it to my colleagues and most of them loves it. 
1) Sweet potato leaves
2) 4 cubes of fermented bean curd 
3) 1 tablespoon of minced garlic
4) 2 slices of ginger
5) Shaoxing wine 3 tablespoon
6) Sugar 1 tablespoon (you can add or reduce according to your taste as some brands of bean curd are more salty)
7) Chicken stock or water
8) 1 chilli chopped 

Steps:
1) Smash the fermented bean curd in a bowl and add the shaoxing wine and sugar. Mix them well and make sure there are no lumps of the bean curd.
2) Heat some oil in the pan. Add in the garlic and chilli. Stir fry them till you smell the fragrance of the garlic.
3) Add in the fermented bean curd sauce and stir fry for a while. 
4) Than add in the sweet potato leaves and stir fry them till they are coated with the sauce.
5) If you like more sauce you can add in some chicken stock and water. Stir fry till the vegetables reduce in size and you can scoop them onto a plate and serve.


Wednesday, October 26, 2011

虾米冬菇炒高丽菜 Stir fry cabbage with dried mushrooms and dried prawns

高丽菜包菜傻傻分不清?!哈哈,这就是我刚开始的疑惑。后来上网查了一下,才发现两者是一样的!为什么我总觉得高丽菜好像整颗都是白色的叶子呢?其实我比较不喜欢吃深绿色的蔬菜。我觉得白色的蔬菜,如:高丽菜及白菜比较好吃因为它们比较甜。但是,好像听过妈妈说白色的蔬菜比较寒凉女孩子还是少吃一点。就因为这样,我很少炒高丽菜和白菜。但是有时吃腻了油菜、芥蓝、清江菜,我就会忍不住想吃白色蔬菜。

觉得虾米炒这道菜最对味!这次我还加了冬菇。如果你喜欢的话,也可以加红萝卜。每次煮这个菜都会是一大盘(因为超市卖的都是一大棵的菜),有时还怕吃不完。不过,我和老公都可以把所有的菜给扫个清光。可见,我们有多么爱吃高丽菜!

食材:
1)高丽菜
2)冬菇冲水洗净,泡水至软,然后切成细条
3)虾米冲水洗净,泡水至稍微软,然后用绍兴酒浸泡
4)高汤或清水半碗
5)蚝油一汤匙
6)绍兴酒少许
7)胡椒粉少许
8)蒜茸少许

步骤:
1)将高丽菜用手一片片剥开,然后切丝。
2)用油锅爆香蒜茸,然后加入虾米,炒至闻到酒香。
3)加入冬菇炒香。
4)加入高丽菜。
5)加入蚝油及高汤。
6)盖锅用中小火焖大概5分钟
7)转大火然后加入绍兴酒和胡椒粉,把所有材料炒均匀就可以熄火上菜了!


Sunday, October 23, 2011

蒜茸蒸虾 Steam Prawns with Minced Garlic and Ginger


上次提到我家附近有好几家海鲜批发店。虽然蛮靠近我家但很少专程去那里买海鲜。常听到人家说那里的虾很新鲜,那天闲着没事做便吵着我先生去看看。这些批发店大部分都是越南人开的。海鲜种类其实也没有很多,每一间都大同小异。一般都卖虾、鲜蚝、三文鱼、螃蟹、龙虾、金鲳鱼、red snapper、 catfish、 mackerel 等。它们大部分都是从墨西哥海湾铺到的。很可惜没有我想吃的魔鬼鱼和斯里兰卡螃蟹 :(。这里卖的螃蟹都是花蟹和dungeon crabs,没有很多肉。我最后就买了虾、scottish salmon 和 鲭鱼(mackerel)。 鲭鱼我就煮了Sambal鱼,已经把食谱挂上了。我想新鲜的虾清蒸最美味,所以就打算煮蒜茸蒸虾。这道菜非常容易做,如果你像我喜欢蒜头的味道一定要试试这道菜。

 食材:
1)大虾 10-15只
2)蒜茸两汤匙
3)姜末两汤匙
4)绍兴酒两汤匙
5)酱油少许
6)麻油少许
7)胡椒粉少许

步骤:
1)用剪刀修剪虾头和虾尾方便吃的时候不会扎到嘴巴。
2)用剪刀稍微将虾背剪开,取出虾肠。
3)将蒜茸和姜末塞在剪开的虾背上。
4)将绍兴酒、酱油、麻油及胡椒粉搅拌均匀然后淋在虾子上面。
5)用大火蒸大概10分钟。
6)蒸好后可以撒一些葱花或辣椒。


Saturday, October 22, 2011

人参鸡汤 Ginseng Chicken Soup


前几天,天气突然转凉了!好高兴哦!今年,休斯顿的温度实在是好像是火焰山那么热。基本上许多地方都已是入秋的天气,但是这里还是很热。这里不但热还闹水荒。有些地方由于太干燥,所以酿成大火。幸好我住的地方没有碰上任何火灾。感谢菩萨保佑!

终于盼到一丝丝冷风,心情也漂亮些。我想是时候可以煮点冬季的汤水了。在韩国超市看到新鲜人参,正好可以煮人参鸡汤。这次我煮的是简易版,不是传统的韩国人参鸡汤。下次等天气再冷些我才煮。到时我一定把食谱放上网。

食材:
1)新鲜人参2只或干人参片(我两样都放,因为我很喜欢汤里有浓浓的人参味)
2)玉竹一把
3)红枣3颗 (或小红枣6颗)去籽
4)枸杞子一把
5)鸡腿一个 (我选择去骨去皮的鸡腿肉)

步骤:
1)用热水川烫鸡腿2-3分钟然后取出备用。
2)玉竹、红枣、枸杞子用水冲洗一下。
3)在锅中煮开6碗的水。水煮开后,把所有材料放入水中。把盖子盖上,让水再次煮开。
4)水煮开后,转小火煮大概2个小时就可以喝汤了!你可以加盐和少许酒调味。


PS:可惜,冷天气只维持3天!等我煮完这道汤,天气又转热了:(  唉,看来这个冬天不太冷!

Wednesday, October 19, 2011

韩国石锅拌饭 Bibimbap


上次做了泡菜汤后,突然引发我对煮韩国料理的兴趣。所以我就上网乱搜寻,找找看有什么及简单又好吃的料理。有一道菜引起我的注意,那就是石锅拌饭!我很喜欢吃这个饭,因为它很健康(大部分都是蔬菜),拌饭用的酱汁又辣又甜很能引起我的食欲。我是一个“无汁不欢,无汤不欢”的人。只要那道菜有美味的酱汁,我就会吃得很开心!就这么决定,我要煮这道菜!

在韩国超市很容易就找到需要得材料。刚好,那天我找到拌饭用的辣酱,而且不是一大罐的,是3条,像牙膏形状的包装,很适合小家庭使用。至于那石锅,我就不买了。我打算用砂锅代替,反正主要是让饭可以起锅巴,砂锅也一样可以办到。

我参考了食谱1)http://aeriskitchen.com/2008/12/bibimbap-비빔밥/ 和 2)http://rasamalaysia.com/bibimbap-recipe/ 。我主要是根据食谱1。这个部落格还有详细的录像教你怎样煮。两个食谱基本上大同小异,小小不同点是用的配菜有点不同。你可以根据你的喜好,随意搭配。我就用了菠菜、豆芽、小黄瓜(没有腌制版)、红萝卜、洋葱、葱段、鸡蛋、泡菜(买现成的)、白萝卜泡菜(买现成的)和鸡肉。原来的食谱是用牛肉,但我不吃牛肉所以改成鸡肉。如果你吃素,可以把鸡肉换成豆腐。我在这里的韩国餐馆就是尝试过用豆腐取代肉类的拌饭,其实也很好吃!

其实,做这个拌饭并不难,只不过有很多步骤,做起来还蛮花时间的。我第一次做,所以手脚慢,等到大功告成,那些配菜都已经凉了。本来还想用砂锅盛饭,然后做出锅巴的效果。后来没时间,也累了所以就将就点,把饭盛在碗里然后把配菜美美摆在上面就完事 ;p 是有点卖相,味道方面,老公说有点像,我也算还满意!花了这么多功夫和时间去做,是值得的!下次我一定要用我的砂锅做“完整版”!

食材:
1)¼ 杯 白萝卜泡菜,切段
2)¼ 杯 泡菜,切段
3)豆芽两把
4)⅓ 洋葱,切丝
5)⅓ 红萝卜,切段
6)⅓ 黄瓜,切段
7)2棵青葱,切段
8)2颗鸡蛋
9)白饭2碗
10)鸡肉切段
11)菠菜2把

酱料:
1)3 汤匙韩式拌饭酱
2)¼ 茶匙酱油
3)1 茶匙米醋
4)2 茶匙糖
5)1汤匙味西林
6)¾ 茶匙芝麻
7)1 茶匙麻油
8)½ 茶匙蒜茸

步骤:
1)用酱油、糖、绍兴酒、麻油、黑胡椒及蒜茸腌鸡肉。腌制鸡肉的同时,准备其他材料。
2) 煮开一锅水然后将菠菜放入热水里川烫1分钟。川烫好后,用冷水冲洗然后挤干水份。把菠菜切成5cm长的段。用盐、麻油及芝麻调味。
3)煮开一锅水然后将豆芽放入热水里川烫5分钟。川烫好后,用盐、麻油及芝麻调味。
4)锅中倒入一点麻油,等油稍热时,快炒葱段5秒钟,加盐调味。把炒好的葱段放在盘里备用。
5)锅中倒入一点麻油,等油稍热时,快炒红萝卜30秒钟,加盐调味。把炒好的红萝卜放在盘里备用。
6)锅中倒入一点麻油,等油稍热时,快炒洋葱20秒钟,加盐调味。把炒好的洋葱放在盘里备用。
7)锅中倒入一点油,等油稍热时,倒入鸡肉炒至熟透。把炒好的鸡肉放在盘里备用。
8)把蛋倒入碗中,加点盐。把蛋白和蛋黄打发均匀。然后把蛋煮成蛋皮。把蛋皮切成细段。
9)把酱料的材料搅拌均匀备用。
10)把饭放在一个大碗里,把所有的配菜摆在饭上。然后将酱料淋在中央。撒一点芝麻在上面。吃的时候,把所有的配菜、饭和酱汁搅拌均匀就可以慢慢享用美食!

这是另一个版本。我比较喜欢吃荷包蛋所以就煎了一个放在饭上。


搅和搅和,好美味哦!

Monday, October 17, 2011

Baked Mackerel with Sambal Belachan Chilli


Whenever my husband and myself miss any food I just have to try cooking it myself. It is a pretty fun journey trying to search for recipes, finding the correct ingredients and if I can't find them I will have to tweak the recipe. If the dish turns out well, I will feel so happy. I must say I am pretty lucky to stay in Houston where I can still find quite a lot of asian ingredients. 


That day we miss the BBQ stingray. But we can't find stingray here. We decided to go to the seafood wholesale centre at Seabrook which is just 15 minutes away from our home to see if they sell any. To our disappointment, they don't sell them.  But they do sell other fresh fishes. My husband says he wants to eat fried mackerel. Therefore we bought some. I only fried 2 of the mackerel for him and save 1 huge one for my experiment for BBQ stingray but mackerel version hehe. 


So the first step is to prepare my sambal belachan chilli. As you can see from the picture above, it doesn't look like sambal chilli but look like hae bee hiam haha! But I didn't add any hae bee at all! It is too dry! According to the many recipes which I have searched, they say must use oil to slowly stir fry until the oil separates or floats from the chilli. But I mine doesn't seem to floats leh. I was thinking maybe I did not add enough oil cos I do not want it to be too oily. This is the part I didn't get it. I shall try another time since I still have so many chillis in my freezer. Oh by the way there are really many different recipes on making this sambal belachan chilli.  I choose the recipe which use more ingredients as I have those at home.  Here is the recipe which I adapted from 2 websites:


Ingredients:
1  Lengkuas (aka Galangal): ~200g
2  Young ginger: ~100g
3  Turmeric: ~50g
4  Shallots: ~750g
5  Candlenuts: ~100g
6  Dried red chilli: ~30g
7  Lemongrass: ~7 stalks
8  Fresh red chilli: ~450g
9  Garlic: ~1 bulb
10 Salt: ~1 1/2 tsp (add when you are frying the rempah)
11 Sugar: ~1 tsp (add when you are frying the rempah)
12 Vegetable oil: ~1 rice bowl (for frying the rempah)
13 1 tablespoon belacan (shrimp paste)

As you pound/blitz the ingredients, adding vegetable oil in small quantities gives you a smoother blend. No measurements for this ... just pour a little here and there as you pound/blitz.
Fry over a low flame for about 1 hour, stirring all the time, until the oil floats to the top. Cool completely before scooping into a sterilised container. Freeze.


Ok next is the fish. This is very easy! Place the banana leaf over the aluminum foil. Spread a layer of the sambal chilli on the leaf, than place the fish on top. Spread another layer of sambal chilli on top of the fish. Squeeze some calamansi juice (I can't get that and I use lime. But calamansi is still the best choice) and wrap up the fish. Place the fish in a baking tray and put it into the preheated oven (around 200 degree C) and bake it for around 10to 15 minutes. Before you eat, squeeze some calamansi juice and you can enjoy the spicy and yummy fish!


Sunday, October 16, 2011

Stir Fry Fish Slices with Fermented Black Bean Sauce 豆豉炒鱼片


I love to use Lee Kum Kee's garlic fermented black bean sauce to steam pork ribs. I bought a big bottle but besides using the sauce for the dish, I was thinking of what other dishes can I use that for. Some time ago, I saw this recipe of using the black beans to stir fry fish head. I decided to change the fish head to fish slices. I have cooked this several times. Sometimes I use the Lee Kum Kee's sauce and sometimes I use the whole fermented black beans. I think both tastes good! You can use other brand's for the sauce but whichever you use, you must taste it before you cook so that you know how salty is the sauce and than you can decide on the amount of sugar to use. For the fish slices, I bought the swai fillets which my husband likes to eat cos the meat is tender. When I am not lazy, I will coat the fish with a little bit of flour and shallow fry them before cooking with the other ingredients. For a healthier version, I will skip this step. If you choose not to fry the fish than you must be careful of not over stirring the fish to mix the sauce so that the fish slices will not break into small pieces. I have used celery to cook with fish. If you don't like it, you can add other vegetables. Maybe you can consider adding the coloured peppers. They are also very good for health. But my fussy eater boss at home doesn't like to eat those, that's why I use celery. 

Ingredients:
1) Fish slices 
2) 1 tablespoon of Lee Kum Kee's garlic fermented black bean sauce
3) 2 to 3 sticks of celery cut into chunks
4) 1 teaspoon of sugar
5) 1 tablespoon of Shaoxing wine
6) 1 clove of garlic, minced

Steps:
1) Heat up the pan with some oil and add in the garlic. Stir fry for a while.
2) Add in the Lee Kum Kee's garlic fermented black bean sauce and stir fry until you can smell the fragrance of the sauce.
3) Add in the sugar.
4) Add in the fish slices and stir fry them until they are almost cooked.
5) Add in the celery.
6) Stir fry to mix the ingredients well and add in the shaoxing wine. 
7) When the fish are cooked, you are ready to serve!


Thursday, October 13, 2011

KimChi Stew


Since watching the korea drama 大长金,many people are curious about Korea cuisine. And I am one of them too! Love the different kim chi style side dishes they serve whenever you go to a Korean restaurant. Many years ago, I went for a guided tour in Korea and they serve mostly hot pot style and kim chi meals. Many of the tour mates were complaining about it, but I love it! 

I am pretty surprise to find a huge Korean supermarket call H Mart in downtown! Now I go there every weekend for my groceries shopping. The veggies, poultry, seafood are more fresh there. And during the weekend they have this corner selling different kinds of freshly made kimchi! Therefore, I always stock up some kimchi in my fridge. Another reason for shopping there is that there is a mini food court serving pretty authentic Korea food at a reasonable price. We will have our lunch there at times when we have a craving for Korea food. 

Since I always have Kimchi in my fridge, I am finding ways to make kimchi dishes. Kwan, a Singaporean friend whom I just met gave me Kimchi stew which she cooked. I love it at 1st taste! I immediately ask her for her recipe. She gave me this website http://aeriskitchen.com/2008/12/kimchi-soup-김치-찌개kimchi-jjigae/  for the recipe. It is a very simple dish and it taste very good! This website I have bookmarked it as there are plenty of Korean dishes recipes there too! Hehe I will experiment some soon! 

If you want to try this Kimchi stew, just check out this website. I follow closely to it except that I added some meat and prawns as well. I even recommend my neighbour to cook it as she loves the stew which I pass to her to try. And she did today! She used salmon instead of the tuna and she added chicken stock instead of plain water. It tasted yummy too! This is another addition of my favourite one pot meal!


Wednesday, October 12, 2011

寿喜烧盖饭 Sukiyaki Don


我超爱吃日本料理!寿司、生鱼片、日本拉面...... 。很可惜,这里很难找到很好吃的日本料理。我在这里如果吃日本餐,就一定点生鱼片或生鱼片寿司。其他的日本菜,我觉得只适合洋人的口味。我很喜欢吃日本的酱料和喝他们的汤。每次都很想吃寿喜烧,但是大部分都是用牛肉去煮。我本身不吃牛肉,所以都没办法尝试。只有一些新加坡的餐馆会为你改用猪肉。

想念日本拉面和寿喜烧,所以就得亲自动手准备。那天刚好又在“吃饭皇帝大”的节目看到他们介绍日本料理。有人介绍寿喜烧盖饭。有点创意喔!而且是一锅熟的煮法,正适合我!

材料:
1)白菜 1/5 切细条
2)猪肉片 10片
3)鸿喜菇 1包
4)日本鱼饼 10片
5)洋葱 半个切条
6)豆腐半盒切片(我用蛋豆腐,你也可以用一般豆腐)
7)鸡蛋2个

酱汁:
1)酱油5大匙
2)清酒3大匙
3)味3大匙
4)糖1大匙
5)七味粉少许

方法:
1)用少许油煎豆腐至金黃焦香,然后放在一旁备用。
2)同锅炒香猪肉片、洋蔥。加入酱油5大匙、清酒3大匙、味醂3大匙、糖1大匙,煮至略滾,將所有食材放入锅內,加上锅蓋煮至略收汁。
3)打开锅蓋下蛋液(蛋液淋边食材不易散),将所有食材倒在白飯上,撒上七味粉即完成。

蛋液刚淋在锅里


其实两碗盖饭应该分开来煮才盖在饭上才会美。但是我很懒惰用一个锅子煮一次,然后把料放在碗上才淋上汁,所以盖饭很丑。哈哈!

Saturday, October 8, 2011

Char Siew 叉烧--成功了!


Yippe finally succeeded! This is the 3rd time I am trying to cook Char Siew. The 1st and 2nd time it did not turn out that well not so flavourful and not that burnt. My husband loves his char siew to be more chao da (burnt) which will give the meat a nice BBQ flavour.  But we don't have a BBQ pit to make it a more burnt feel. I only use my oven and to get it more burnt, I use the broil function. But well not very successful. And my husband just say, "hmm, 就是不象,少了一些味道。" probe him further, he says,"不知道,就是少了一些味道". Very helpful indeed!  

The other day, while I was watching 冰冰好料理,they were teaching how to make Char Siew. I was so excited and quickly noted down the recipe.  One of the chef was from Hong Kong and she uses BBQ sauce brought from stalls and other ingredients to mix with it to get the seasoning part. I still have some spare ribs sauce from Lee Kum Kee which well taste slightly like BBQ sauce so I did not go and buy another bottle of BBQ sauce. 

For my 3rd attempt, I will still use the recipe I got from Rasa Malaysia website and combine with the recipe I learnt from 冰冰好料理. The seasoning part I will follow mainly from Rasa Malaysia's recipe and the method of cooking I will follow 冰冰好料理. I still have some spare ribs sauce from Lee Kum Kee which well taste slightly like BBQ sauce so I did not go and buy another bottle of BBQ sauce. The only thing I specially bought is 沙姜粉. I bought this as I saw another recipe for cooking chicken which uses this as well. It has a nice aroma so I guess it will enhance the flavour of the char siew.

It takes some patience in making this. First of all got to find the right choice of meat. Than you have to marinate the meat for at least a day. And you have to keep taking out and brush on the seasoning and honey on the char siew in the process of cooking. But I must say it is all worth the effort! 


Regarding the choice of meat, I have to quote from Rasa Malaysia : "if you love your char siu (char siew) tender, juicy, moist, and a little fatty, use pork belly. If you prefer a meaty char siu (char siew), then go for pork loin. If you like it somewhere in between, then pork butt will be a great choice." For my char siew, the first 2 attempts I chose the pork butt but with less fat. For my recent attempt I heeded the advice of the chef in the show to get pork butt with more fats. The fats will make the meat be more juicy. And I prefer my char siew to have some fats (though I am not suppose to eat fatty meat but once in a while can still indulge lah ;p) 


Ok too long winded, let's look at how to cook char siew:


Ingredients:

1 lb pork butt (cut into 4 pieces)
3 clove garlic (finely chopped)
1 1/2 tablespoons cooking oil

CHAR SIU (CHAR SIEW) SAUCE:

1 1/2 tablespoons maltose (I don't have this so I omitted it)
1 1/2 tablespoons honey
1 1/2 tablespoons hoisin sauce
1 1/2 tablespoons soy sauce
1 tablespoon Chinese rose wine (玫瑰露酒) (I don't have this and i replaced it with Shaoxing Wine)
3 dashes white pepper powder
1 1/2 tablespoon of BBQ sauce
1/2 teaspoon five-spice powder
1/2 teaspoon 沙姜粉 
1/2 teaspoon sesame oil

METHOD:
1)Add all ingredients of the char siew sauce in a sauce pan, heat it up and stir-well until all blended and become slightly thickened and sticky.  Transfer out and let cool. You must be careful not to get it too thick, if not when it cools down it becomes hard. For this time round, I did not cook the sauce for marinating the meat. Instead I pour some of the un-cook sauce (for brushing the char siew later) into a bowl and use the microwave to heat it up for a while and the sauce will thicken. But you must be careful not to overheat. This cooked sauce is used for brushing the char siew later.
2) After cutting the pork butt into 4 pieces, use the other side of the knife blade to pound the meat. Be careful not to chop it apart. Than use a fork to poke the meat as well. Marinate the pork butt pieces with 2/3 of the char siew sauce and the chopped garlic overnight. Add 1 1/2 tablespoons cooking oil into the remaining char siew sauce (if you are cooking the sauce for marinating).  Keep in the fridge.
 3) Place some water in a deep baking tray and put a BBQ mesh on top of the tray. Brush some oil on the mesh. Skew the char siews on satay sticks. Place the on the BBQ mesh. Heat the oven to 375 degree F (around 200 degree C) and roast the char siew for 20 minutes (shake off the excess char siu sauce before roasting). After 20 minutes, take them out and flip them over, brush some of the char siew on them.  Put them back into the oven and heat for another 20 minutes. After 20 minutes, take them out and coat it with honey and sauce and than broil it for 3 minutes. After 3 minutes, take them out again, flip them over and brush honey and sauce. Broil it for another 3 minutes.   You must watch the char siew when broiling and be careful not to over burnt them.


4) You can cut them into small pieces and drizzle some more sauces if you still have any left on top of the char siew. 


Add caption


I use my char siew to cook my 云吞叉烧面!绝配!


Friday, October 7, 2011

三色萝卜汤 Trio Carrot Soup


我第一次喝白萝卜汤是在我家婆家。我妈妈从来没有煮过萝卜汤。基本上我们家不吃白萝卜因为我们家经常有人吃中药而白萝卜是解药的。我在家婆家喝到这个汤时,就爱上它!汤不仅有萝卜的甜味,那萝卜也很好吃哦!我找到一个食谱是用三种萝卜煮的汤,我想汤一定很甜!结果,我一点也没有猜错。

为了让汤更鲜甜, 我加了干贝,让这个汤成了升级版 ;p 

材料:
1)白萝卜
2)青萝卜
3)红萝卜
4)干蚝 5 只
5)  干贝6-7颗
6)排骨或瘦肉
7)姜片4片

步骤:
1) 用热水川烫瘦肉。
2)干贝及干蚝用水冲洗一下。
3)将锅中的热水煮开,然后将所有材料倒进锅里。用大火让水再次煮沸。
4)然后转小火,让汤煮2个小时。


Wednesday, October 5, 2011

酸甜玉子豆腐虾 Sweet and Sour Egg Tou Fu Prawns


玉子豆腐就是蛋豆腐。这里好难才找到玉子豆腐!差不多走遍唐人街的超市,就只有黄金超市卖这种豆腐。很奇怪,难道难道这里的华人都不喜欢吃吗?所以,每次想吃蛋豆腐就得专程到那个超市买,而且一买就买好几条。

我超爱吃蛋豆腐,因为它的口感和一般豆腐不一样,而且豆的味道没有那么浓。我妈妈喜欢把蛋豆腐切片,然后在每一片上面放上绞肉,然后拿去蒸。这就成为一道简单健康的菜色了!我下次再把这道蒸豆腐的食谱放上网。其实很简单的,可能不需要我的食谱你就能煮出这道菜。

比较喜欢重一点口味的人,可能就会比较喜欢我那天煮的酸甜玉子豆腐虾。有谁不喜欢酸酸甜甜的味道啊!我觉得好开胃啊。我先生不太喜欢吃蒸豆腐,可是只要我煮这道菜,他就会吃好多。你也可以用一般豆腐煮,味道也应该会很好吃!

食材:
1)蛋豆腐一条,切厚片
2)虾仁 大概10只
3)芹菜末 (你也可以用那种冷冻的豆仁、玉米粒、红萝卜粒)
4)番茄一个,切块
5)番茄酱2汤匙
6)蚝油1汤匙
7)糖少许
8)水少许
9)蒜末少许

步骤:
1)在锅中热少许油,将豆腐煎至两面有点焦黄。豆腐一定要抹干,不然煎的时候就会喷油。煎好后,放在碟子备用。
2)在锅中热少许油,将虾仁放入锅中稍微煎一下,然后加入蒜末和芹菜末炒一下。
3)加入番茄酱,蚝油和糖。酱汁要炒一炒才会香。如果你觉得酱汁不够就加入水少许。
4)加入煎好的豆腐,让豆腐在酱汁里面焖大概3分钟。
5)3分钟后就可以盛盘。


Tuesday, October 4, 2011

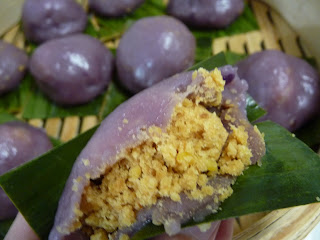
Ang Ku Kuih without the Ang Ku 没有红龟的红龟粿 ;p


Ang Ku Kuih is usually used for 拜拜or during babies 1st month celebration, according to the Hokkien tradition(I think it is Hokkien) , they will give ang ku kuih. It is call ang ku (红龟) because it is made using red colouring and they are put into a mould with a tortoise shape in it. The filling is usually made of green beans or peanuts. I prefer the green beans filling. Actually it is the green beans filling which makes me crave for ang ku kuih haha. Since I can't find any ang ku kuih here in Houston, I will have to make it myself. 

As usual I have searched the net and combine 2 recipes.  One is from Rasa Malaysia and the other is Asian Kitchen. I learnt the way to make the filling from Rasa Malaysia's blog and the skin recipe from My Asian Kitchen.  I like the way the Asian Kitchen make the skin cos it uses Purple sweet potato which gives the kuih the natural purple colour (though it is not red, but I am ok with it). As I don't have the mould, I will just make it into a ball hehe. 

I think the filling is a bit difficult to make. I have melted the sugar with the heated oil.But when I add in the green beans, the mixture starts to become lumpy and I can see the sugar becomes like gluey. Had a difficult time trying to melt the sugar again. In the end I added more oil and patiently stir and mix the mixture well. Don't know what went wrong or maybe there is a secret formula to do this. Anyone can tell me how to do it?? 

Here is the recipe:

Ingredients for Filling:
300g Split Green Bean (Washed and soaked for 6 hours)
200g Fine Sugar (I reduce it to 150g as I try not to eat too sweet)
4Tbsp Oil
Method:
1  Steam green bean over boiling water for 30-40 minutes till soft.

2  Blend or mashed green bean till become a paste.

3  In a wok, combine green bean paste, sugar and oil. Stir on low medium heat till thick and do not stick to your hands. (This part I can't get the thicker consistency don't know what went wrong)

4  Cool it and shaped into balls. 

Ang Ku Skin
    Ingredients:
    150 gm cooked purple sweet potato,peeled and mashed
    375 gm glutinous rice flour(sifted)
    200 ml water
    50 gm sugar
    3 tbsp oil
    15 x banana leave (8x8 cm)
    Method:
    1  Steam sweet potato till cooked.Mash well while it's still hot,set aside in a large bowl.

    2 Combine 40 gm of glutinous rice flour with 30 ml of water, knead into dough.Add the dough into rolling boil water and cook until it's floats, dish out and set aside. 

    3  Mix the remaining portion of flour with sugar and water, mashed sweet potato, oil and the cooked dough. Knead all ingredients well till all smooth and combine. Divided the dough into 15 equal portion into ball shape. (I did not add all the water in one shot. And I add the oil last, 1 tbsp at a time)

    4 Flatten each ball shape dough in round shape on your palm, place the green bean fillings on the center of the dough.Wrap the filling and roll into a ball.

    Place the ang ku kueh on a pieces of cut banana leaf brushed with oil

    Uncook version

    Prepared water in steamer at high heat and bring it to boil.Placed ang ku kueh in the steamer rack about 2 inch each apart.(if not it will stick together when it bloom when steaming) Steam over medium heat for 10 minutes.

    Remove and brush with some oil.(I didn't brush with oil for a healthier version).

    I find my green bean filling a bit dry and the skin is too thin. I guess I might have added too much water or my filling is too big ;p. I think next time I will add less water and oil at a time to get a better ang ku kuih skin. But overall, I have satisfied my craving for ang ku kuih !! Yummy. I am eating one when finishing this post ;)